First time users
My first steps with Avastar
You purchased Avastar and now you are eager to make awesome content. We understand you want to start seeing results in 5 minutes. So lets try to get there…
But can you answer yes to those questions?:
-
I have purchased the Avastar and i found it in my Download folder
-
I have successfully installed the Avastar
- I have checked out the Newbie page and i am eager to start.
All questions answered with yes? Then you are ready to take off…
My first steps
-
Startup Blender.
-
3D-View: add -> Avastar
-
Toolshelf: Avastar -> Avatar Appearance
-
Shape your character with the SL Sliders.
-
Toolshelf: Export your character
-
SL: Import the model.
Watch the video and read the First Steps …
Appearance Sliders
We support the same appearance slider system as you can find in SL, OpenSim or other compatible worlds. You find the sliders in the properties panel of the 3D Viewport – in the Avastar Tab:
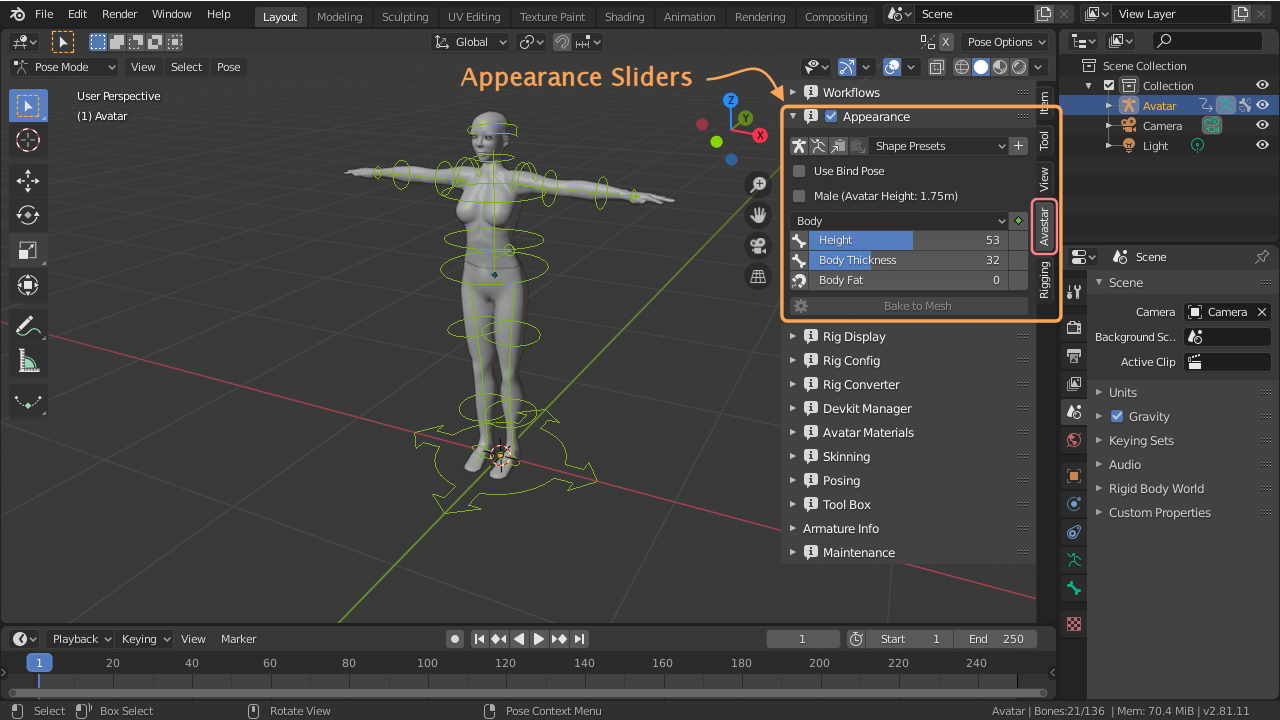
Playing the Sliders
-
Go to object mode.
-
Select the Rig (LMB(i) on the yellow circles).
-
Open the N-Panel – Avastar Tab
-
Here you find the Appearance Panel (see image).
- Use the sliders to modify your Shape as you like

Get more detailed from the Appearance Sliders Help page…
Mesh Clones
Important: In some cases you may want to modify (edit) the Avastar character meshes. For example when you want to …
-
Create a tiny or a giant.
-
Add extra shape beyond what you can do with sliders.
-
Modify the Avastar Meshes into something totally different.
-
Join the character parts to have one single mesh body
Well, you actually can do this. But you must convert the Avastar Meshes into regular custom meshes ( see the Freeze option in the Avastar Tool Box).
If you do not prepare (freeze) the Avastar meshes, then you have a good chance to break Avastar and create wild results as shown below:
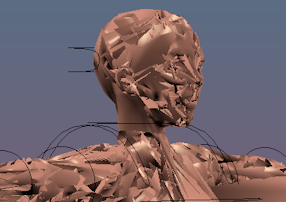
Unexpected results after small edits in the Avastar meshes
The technical reason for this behavior
Avastar needs to translate the slider settings into the final shape as you can see in the Blender 3D View. However the shape calculation is based on a hidden reference shape. This reference shape is created once when the sliders are setup for the character. And Avastar relies on the reference shape having the same mesh topology (same number of verts, edges and faces) as the visible mesh.
But as soon as you edit the visible mesh you introduce a difference to the reference shape. Then it becomes likely that Avastar gets everything wrong. And things like in the image above can happen.
You can get over this by freezing the Avastar character. Basically you then remove all shape keys from the character. What this means will be explained later.
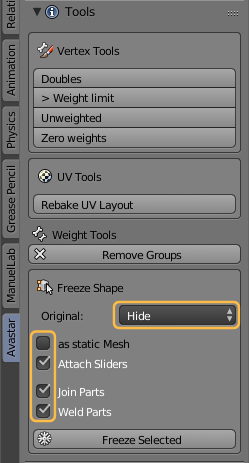
Create a Mesh Clone
-
Go to Object Mode
-
Select the Head (use LMB(i))
- then SHIFT-LMB(i) the Upper Body
and the Lower Body of the Avastar -
Open the N-Panel – Avastar Tab
-
Open the Tools Panel on the Avastar Tab
-
Locate the Freeze Shape section
-
Modify the options
- Disable Attach Sliders(*)
- Enable Join Parts
- EnableWeld Parts - Freeze Selected
Now you have created a mesh Clone of the System character. You now can go ahead and modify and edit your mesh to your likes
Get more detailed from the Mesh Clones Workflow page…
Create a Pose
The art of Posing
This article will try to get you started quickly. We will reproduce the simple pose as shown in the image to the right. And fortunately Avastar provides a few tools which let you create such a pose within less than 2 minutes (after you know how to do it of course)

Get more details from the Pose a character page…
Create an Animation
The art of Animation

Here is how to create your first Animation using Avastar. I assume that you have a bit of experience with Blender. We will do a three frame animation. This is just to get you started, as your experience grows you will find there are much faster and fun ways to pose and animate your character. It’s assumed you’ve already installed Avastar.
Note: Avastar supports .bvh and .anim format. Both formats are fully supported by all major viewers for OpenSim and compatible online worlds.
Get more detailed from the Animate a character page…